How to Set Up CLINs (Contract Line Items Numbers)
- Mark Vieno
- Oct 7, 2025
- 8 min read
Updated: Oct 28, 2025
This article is a step by step guide to setting up CLINs in QuickBooks Online and GovBooks.
Understanding CLINs in Government Contracting
When working with the federal government, attention to structure and detail is everything — especially when it comes to how contracts are organized and billed. One of the key tools the government uses to manage contracts effectively is the Contract Line Item Number (CLIN). Understanding how CLINs work is essential for any contractor seeking to stay compliant and streamline billing, delivery, and reporting.
A Contract Line Item Number (CLIN) is a unique, four-digit number used to identify a specific product, service, or deliverable within a government contract. Each CLIN represents a separately identifiable portion of the contract — defining what is being purchased, how much it costs, and how it will be delivered and invoiced.
In short, CLINs break a complex contract into manageable, traceable components.
Step by Step Instructions
Step 1: Understand Your Contract Structure
Before entering anything in GovBooks, start with your contract award document.
For each CLIN, identify:
CLIN Number (e.g., 0001, 0002AA)
Description of the item or service
Contract type (FFP, T&M, Cost Reimbursable, etc.)
Period of performance
Quantity and unit
Unit price or estimated cost
Funding information
You will use this information in both QuickBooks Online and GovBooks to set up CLINs.
Step 2: Set Up Your Contract in QuickBooks Online
GovBooks will connect directly with your customers, sub-customers and projects in QuickBooks Online. Therefore, it is important to first properly set up QuickBooks Online.
There are 2 steps that must be completed for each contract that is set up in QuickBooks Online.
Set up the Customer in QuickBooks Online
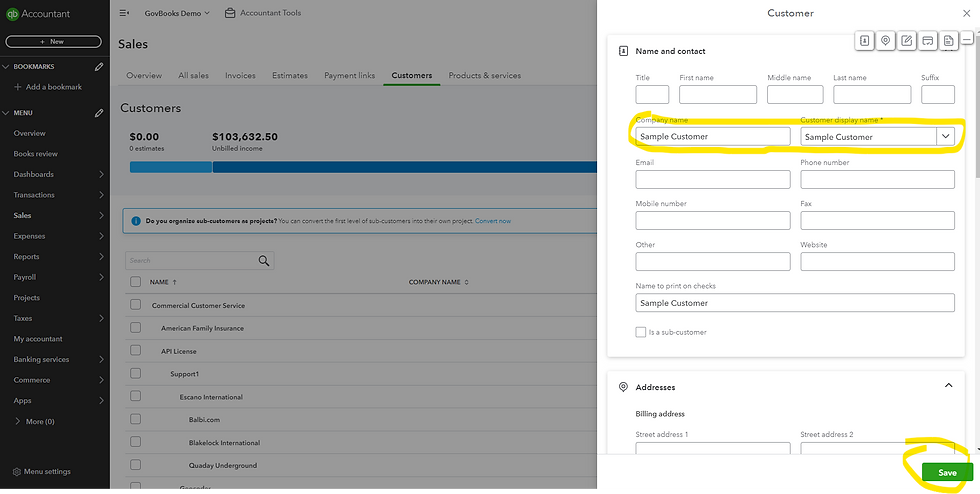
Your first step in QuickBooks Online is to set up a Customer. Contracts are then created and assigned to Customers in QuickBooks Online.
Open the Customer screen in QuickBooks Online and click on "New customer".

Next, fill in your customer information and click "Save".

Setup the Contract in QuickBooks Online
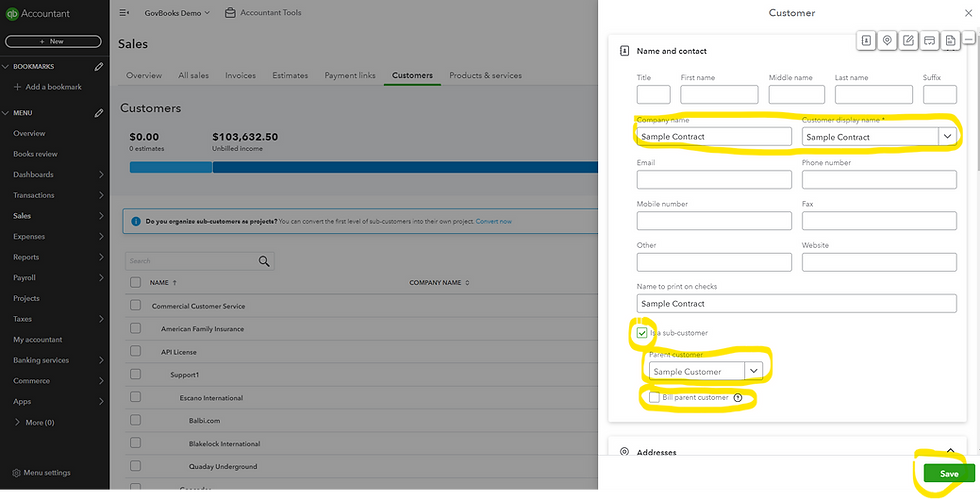
QuickBooks Online does not have a contract or grant module, so instead we use a sub-customer that is then attached to the customer.
GovBooks, however, does have an Awards module that is used to manage contracts, and it connects directly to QuickBooks Online.
To create a sub-customer, start by creating a customer, except this time you will repurpose the "Company name" field by entering a contract name. I recommend incorporating the contract number in some manner within the name field since your auditor will use this to map your accounting system to your contract documents.
Then, check the box "Is a sub-customer" and select the parent customer (the customer that this contract is assigned to). Note that if you have multiple contracts from the same customer, you should use the same customer as the parent customer.
Finally, government contracts are billed and funded at the contract level, not the customer level, so you should uncheck "Bill parent customer". This will prevent billings from more than one contract to be rolled up and billed at the customer level. Keep this feature in mind. It's a handy way to roll up invoices to a higher level and gives you flexibility in how you design your contract setup.

Avoid the use of QuickBooks Projects
I do not recommend using projects in QuickBooks Online and instead recommend using only sub-customers for the following reasons:
QuickBooks Online projects cannot become a sub-project of a higher level project in QuickBooks Online. In other works, you cannot nest a QuickBooks Online project below another project. This limits changes to your contract structure in the future.
Projects in QuickBooks Online cannot be converted to a sub-customer. Although you can convert a sub-customer to a project, it cannot be reversed. The conversion process is permanent, which locks the project into always being at the bottom of nesting hierarchy.
A project in QuickBooks Online cannot be a Billing Parent for another projects, so rolling up a project to a higher level project for billing purposes is not possible.
This is how GovBooks uses QuickBooks Online customers, sub-customers and projects:
A GovBooks Customer maps to any QuickBooks Online customer, sub-customer, or project, giving you the greatest amount of flexibility in report design in GovBooks.
A GovBooks Project maps to any QuickBooks Online customer, sub-customer, or project, giving you the greatest amount of flexibility in report design in GovBooks.
GovBooks breaks the five-level limitation of the QuickBooks Online customer, sub-customer and project hierarchy by allowing an unlimited number of associations in report design in GovBooks.
The reporting capabilities of GovBooks allows you to design your reports without the limitations imposed by QuickBooks Online.
Step 3: Set Up Your CLINs as Sub-customers in QuickBooks Online
Contract Breakdown Structure
Before setting up your CLINs in QuickBooks Online, it is important to consider your contract breakdown structure.
Breakdown structure refers to segregating your contract into finite segments needed to track billing, funding, period of performance, tasks, milestones, CLINs, labor categories, reporting requirements, etc. These requirements are determined by the terms of your contract. It is important to carefully examine your contract at this point before proceeding with this step to develop a setup design that addresses these requirements upfront.
Given the multitude of scenarios and requirements, breakdown structure can vary quite a bit and there can be more than one way to capture these requirements in QuickBooks Online.
It is helpful to categorize breakdown structures into various types. Each type of breakdown structure has a typical setup:
Basic contracts
Contracts with funding periods
Contracts with CLINs
IDIQs with task orders
Labor category contracts
Delivery orders contracts
Cost Reimbursable contracts
When designing your breakdown structure, I recommend using all five levels of your customer/sub-customer hierarchy available in QuickBooks Online, and avoid using items to break down your contract. QuickBooks Online also has a feature called "Projects". I recommend that you also avoid using projects in QuickBooks Online which limit your ability to change your breakdown structure in the future.
Typical Breakdown Structure of a Contract with CLINs
This example is a typical breakdown structure for a contract with CLINs:
Top level: Customer Customer
Level 2: Sub-customer Contract
Level 3*: Sub-customer Period of Performance (optional, as needed)
Level 4: Sub-customer CLIN
Level 5*: Sub-customer Labor category or SLIN (optional, as needed)

*Note: Levels 3 and 5 are optional or set up as needed.
Level 3 - Optional, as needed. Some contracts have more than one funding period with a start date and an end date. Funding does not carry forward to the next period and therefore needs to be tracked using separate sub-customers.
Level 5 - Optional, as needed. Some contracts require CLINS to be broken down further by Labor Category to track funding or a budget for a Labor Category. Others have sub-CLINs that break down CLIN funding, perhaps by task or period of performance.
Also note that the use of QuickBooks Online projects is not needed and not recommended. Using sub-customers allow you to reorganize your breakdown structure in the future if needed.
Step 4: Determine Your Billing Level in QuickBooks Online
Given the five levels available in QuickBooks Online, you will need to determine your billing level by selecting one of the five levels to use when creating invoices in QuickBooks Online. This is determined by your invoicing requirements on your contract. Lower levels can be rolled up to a higher level designated as a Billing Parent for QuickBooks Online customers, sub-customers and projects. Note that a QuickBooks Online project cannot be a Billing Parent for another project, so I recommend using only sub-customers instead of projects.
Step 5: Set Up Service Items in QuickBooks Online
In QuickBooks Online, service items are used as the line items on an invoice for billing purposes.
Use service items only for invoicing. Avoid using service items to track funding on a CLIN, SLIN, Labor Category or ODC Line.

In GovBooks, as an option, you can track contract funding at the level of the service item. However, it adds complication to most government contracts and is not necessary. In some rare cases, it may be needed. If you have an existing contract set up in QuickBooks Online and did not break out CLIN funding by sub-customer or project, don't worry, GovBooks can handle it with additional steps (more on this below).
Step 6: Set Up the Award in GovBooks
The Awards module in GovBooks allows you to track contract funding, allocate indirect expenses based on indirect rates to contracts, and track contract backlog.
Start in the Award Setup screen.
Enter an Award Name for the contract.
Select the QuickBooks Online customer from the Customer field.
Select the Award Category.
Enter the Prime Award Number (optional).
Enter the Subaward Number (optional).
Enter an Internal Award Number (optional).
Select one or more Award Managers from the list of GovBooks users (optional).
Select an Award Type.
Enter notes (optional).
Enter a start date and end date (optional).
The default status is Active.
Click on Save and New.

Step 7: Set Up the Funding Screen in GovBooks
The Funding Setup screen is where you design how GovBooks will track funding on your contract and must be set up before you can enter funding amounts.
Next, open the Funding Setup screen
Select the QuickBooks Online customer in the Customer field.
Select the Award Name.
Determine whether you will use Line Items.
Select "No" if you will not use Line Items.

You may need to use Line Items if your Award is broken down into funding categories, such as Period of Performance, CLIN, Labor Categories, etc. In this case, select "Yes" in the "Use Line Items" field.

If you need to use Line Items, enter the Line Item Title and Line Item Number. Then select the the QuickBooks Online customers, sub-customers and/or projects associated with the Award in the "Projects" field.
In the "Filter by QBO Item" field, select "No" if you do not need to break down and filter the Line Item funding QuickBooks Online service item.
However, if you need to break down and filter the Line Item by QuickBooks Online service items, select "Yes" in the "Filter by QBO Items" field. The, select the relevant service items from QuickBooks Online.
Select "Yes" for Award Modification if you would like to associate the Funding record with a contract modification set up in the Award Modification screen (optional). Then, select the Modification Number, If not, accept the default, "No" to skip the Award Modification.
Select the Award Type.
Enter any Notes (optional).
Enter a Start Date and End Date (optional).
Click "Save & New".

Step 8: Enter Funding in GovBooks
Now we can move on to the Enter Funding screen in GovBooks to enter the amounts that have been awarded and funded on your contract.
Select the Customer.
Select the Award Name.
If you are using Line Items, select Line Item for which you would like to enter the funding (optional).
Select the Award Modification (optional).
Enter the Units from the dropdown list based on your contract.
Enter the Unit Price.
Enter the Quantity Awarded.
Enter the Quantity Budgeted or Funded.
Enter the Start Date.
Enter the End Date (optional).
Click "Save & New".

.png)
