.png)
How to Create and Post the Labor Distribution in GovBooks
- Mark Vieno
- Dec 19, 2024
- 9 min read

Updated: May 27, 2025
The Labor Distribution calculates and allocates labor costs based on timesheets and payroll wage payments for W2 employees (and in special cases, 1099s and subcontractors) and posts the labor costs to both the general ledger labor accounts and the projects in QuickBooks Online.
QuickBooks Online is not able to create a compliant and accurate labor distribution on its own. Almost all payroll systems are not able to do so. GovBooks is the solution and creates an accurate labor distribution using either Total Time Accounting or Standard Rate Method and posting to QuickBooks Online and posting to both the Project and to the General Ledger Labor Account.
This article shows how to set up the Labor Distribution module in GovBooks by creating one or more Pay Cycles, setting up Projects and Employees, and calculating and posting the Labor Distribution to QuickBooks Online. The use of Service Items as an option are also discussed.
Step 1:
Click the "Labor Distribution" module on the left-hand menu bar.

Step 2:
Set up your pay cycles. You will need at least one pay cycle that matches the pay cycle used to run your payroll. You may have as many different pay cycles as required. Click "Pay Cycle".

Step 3:
Click "Add New Pay Cycle" if you need to add a new pay cycle.

Step 4:
To add a new pay cycle, click in the empty "Pay Cycle Type" field.

Step 5:
Display the Pay Cycle Type options by clicking the down arrow. GovBooks supports 4 standard pay cycles; Weekly, Bi-weekly, Semi-monthly and Monthly. It is important to select the correct Pay Cycle Type because your selection will affect the labor distribution calculation. You may have more than one pay cycle for any given Pay Cycle Type as long as the Pay Cycle Name is unique. Click the desired Pay Cycle Type.

Step 6:
Give the new Pay Cycle a name by entering it in the Pay Cycle Name field. If you create additional Pay Cycles with the same Pay Cycle Type, the Pay Cycle Name must be unique for the given Pay Cycle Type.

Step 7:
When you have completed your entry, click "Save changes". You have now created a new Pay Cycle. This new Pay Cycle has been saved for use with labor distribution calculations.

Step 8:
In GovBooks, you have the option of mapping Projects directly to general ledger labor accounts. Your other option is to use Service Items in QuickBooks Online to map to general ledger labor accounts. If you prefer to map Projects directly to general ledger labor accounts in GovBooks, your next step is to set up Projects. Click "Projects" in the Labor Distribution module.

Step 9:
If you decide to map Projects to general ledger labor accounts in GovBooks (instead of using Service Items in QuickBooks Online), click "Add New Project". You will need to add the projects to which employees charge time, including billable time, non-billable time and paid leave. The projects and paid leave are mapped here to general ledger labor accounts in QuickBooks Online.

Step 10:
If you decide to map Projects to general ledger labor accounts in GovBooks (instead of using Service Items in QuickBooks Online), click on the "Customer:Project" blank field and select the Project.

Step 11:
If you decide to map Projects to general ledger labor accounts in GovBooks (instead of using Service Items in QuickBooks Online), click on "General Ledger Account" and select the Labor Account from QuickBooks Online that is associated with the Project. A Project can be associated with only one Labor Account. However, a Labor Account can be associated with an unlimited number of Projects so you do not need to set up unique Labor Accounts for each Project. If your Project requires more than one Labor Account, you can instead use the Service Item method (discussed later) or simply set up an additional Project that is mapped to the additional Labor Account.

Step 12:
If you decide to map Projects to general ledger labor accounts in GovBooks (instead of using Service Items in QuickBooks Online), and you have a lot of Projects to map, you can upload an Excel file with the Project information. Start by exporting a sample Excel template by clicking on the "Export Excel" button.

Step 13:
If you decide to map Projects to general ledger labor accounts in GovBooks (instead of using Service Items in QuickBooks Online), and want to import your Project information, use the exported Excel template by adding your data, and then click "Select file" to upload the Excel file.

Step 14:
Your next step is to set up employees. Click "Employees" in the Labor Distribution module.

Step 15:
To add a new employee, the down arrow in the "Employee" field. You will see displayed a list of employees and vendor names from QuickBooks Online. Vendors are included in the list to allow you to use this field for employees if you would like, or to do a labor distribution for 1099s or subcontractors in special cases.

Step 16:
Select the employee or vendor you would like to set up.

Step 17:
Next, click in the "Pay Type" field. Choose between "Salary" and "Hourly" for this person. It is important to select the correct Pay Type and reflect how the person is actually paid because this selection will affect the labor distribution calculation. For purposes of GovBooks, a person is paid a "Salary" when they receive a fixed wage payment for a given Pay Period regardless of the number of hours they work. A person is paid "Hourly" when they receive a wage payment for a given Pay Period determined by the number hours recorded on their timesheet multiplied by an hourly wage rate.

Step 18:
Next, click in the "Pay Cycle" field. Select the "Pay Cycle Name" that is associated with the person.

Step 19:
Next, enter the person's actual compensation received for the pay cycle. If the person's compensation is "Salary" then enter the annual amount. If the person's compensation is "Hourly" then enter the hourly wage paid to the person. The compensation data will be saved for future labor distributions until you change it. If you forget to update the compensation data, you will notice a payroll variance between the labor distribution calculation and your payroll service's payroll register or journal entry. If this occurs, simply update the compensation here in GovBooks are re-calculate and re-post the labor distribution. Note: GovBooks intentionally does not connect to outside payroll systems to pull in compensation data. The labor distribution is commonly calculated at month-end close, the following month or later, and compensation data imported from a payroll service may have changed since running the previous payroll. In addition, many companies use the Labor Distribution module in GovBooks to update or correct historical labor distributions from months or years prior.

Step 20:
When you have completed the setup for an employee, click "Save & New".

Step 21:
If you have a lot of employees to set up, you can upload an Excel file with the employee information. Start by exporting a sample Excel template by clicking on the "Export Excel" button.

Step 22:
To import your employee information, use the exported Excel template and add your data, and then click "Select file" to upload the Excel file.

Step 23:
Now you are ready to compute and post the labor distribution. Click "Export Labor Distribution" in the Labor Distribution module in the left-hand menu.

Step 24:
The Labor Distribution can be calculated for one Pay Period and one Pay Cycle at a time. This can get confusing so let's define a few terms. The Pay Period is the date range that is covered for a single paycheck generated by your payroll service. The Pay Cycle is the frequency that payroll is run, either weekly, bi-weekly, semi-monthly or monthly. Ok let's proceed. In the "Begin Date" and "End Date" fields, enter the first date of the Pay Period and the last date of the Pay Period from your payroll service. This is not the same as the pay date or the date on which employees are paid. The Pay Period is the actual time period for which employees are paid and can be found in your payroll service. For instance, if your Pay Cycle Type is semi-monthly, it begins on the first day of the month and ends on the 15th day of the month, or begins on the 16th day of the month and ends on the last day of the month. Ensure that the date range you enter is for only one Pay Period because this affects the labor distribution calculation which is performed for only one Pay Period at a time because the compensation rate and number of hours can vary by Pay Period. Do not attempt to short cut this process by running multiple labor distributions as one Pay Period because your labor distribution will most probably be incorrect.

Step 25:
Next, select the "Payroll Clearing Account" to be used to capture the credit side of the transaction when you post the labor distribution to QuickBooks Online. You will see all of your current liability accounts from QuickBooks Online. I suggest you establish a new general ledger account in QuickBooks Online in the current liability section called "Payroll Clearing" or "Accrued Wages" so that you can isolate the labor distribution and payroll wage records in one account to make the reconciliation between labor distribution and payroll as easy as possible. GovBooks will remember your selection for the next labor distribution until you change it.

Step 26:
Select the Pay Cycle associated with this labor distribution. You can run the labor distribution for only one Pay Cycle at a time.

Step 27:
In the "Account Mapping" field, select whether you will use Projects or Service Items to map to general ledger labor accounts. "Use Projects" is the easiest method and will bypass the requirement for using Service Items. However, QuickBooks Online has a limitation of 5 levels to its Project hierarchy, so if you need more than 5 levels, you will need to use Service Items to extend your project breakdown by another 5 levels for a total of up to 10 levels.

Step 28:
Select the employees to include in the Labor Distribution. The default value is "All" which means all employees in the Employee set up screen in the GovBooks Labor Distribution which have been associated with the selected Pay Cycle. If you click in the field, displayed will be all the employees that are associated with the Pay Cycle, and you can select one or any combination to filter your Labor Distribution.

Step 29:
Next, select the "Distribution Method". GovBooks supports two distribution methods, "Total Time" and "Standard Rate". The default value is "Total Time" because it is the most popular option among government contractors and non-profits. It is also the most accurate method preferred by the government auditors because it nearly eliminates the payroll variance between the labor distribution and the payroll service (except for a small pennies-level rounding error for salaried employees which is unavoidable). For those companies that use "Standard Rate" we also offer that option although it is less accurate and can result in a large payroll variance. The calculation method for the "Total Time" distribution method makes an adjustment for salaried employees by dividing the fixed salary amount paid for the Pay Period and dividing it by the actual number of hours recorded on the employee's timesheet, which may be more or less than a standard 40-hour work week. This process in calculates a new "effective" hourly rate for salaried employees unique to each Pay Period depending on the number of hours that are recorded, and it uses this new "effective" hourly rate to allocate the labor costs to labor accounts and projects. The "Standard Rate" distribution method simply treats all employees, whether salaried or hourly, as hourly employees; however as stated before, the "Standard Rate" method can create a large payroll variance and therefore is not recommended if you have a choice.

Step 30:
You are now ready to calculate the Labor Distribution. Click "Calculate".

Step 31:
After a few moments, the Labor Distribution is calculated and displayed in a table for your review. The time data is imported from QuickBooks Online and the labor costs are calculated based on the distribution method selected. You may click "Export to Excel" for further analysis, or after reviewing here in the time table, you may post to QuickBooks Online. After posting to QuickBooks Online, if you find an error and need to make a correction to the Labor Distribution, you can edit the Labor Distribution directly in the Expense record in QuickBooks Online, or change the time data in QuickBooks Online if that is the issue, and simply re-calculate the Labor Distribution in GovBooks and then re-post the Labor Distribution to QuickBooks Online, in which case the previous Expense record in QuickBooks Online will be deleted and the new record will be inserted.

Step 32:
The Labor Distribution will appear as an Expense record in QuickBooks Online for each employee showing the break out of each labor charge posted to both the Labor Accounts (general ledger accounts) and the Projects (customer:project).

Service Item Method
The use of Service Items in QuickBooks Online is an advanced feature that allows a Project to be broken down into additional Service Items. The Project hierarchy in QuickBooks Online is limited to 5 levels. If you need to break down a project even further, the use of Service Items can add an additional 5 levels for a total of up to 10 levels of Project breakdown. The Labor Distribution in GovBooks is able to handle the use of Service Items if the Service Items are set up correctly in QuickBooks Online. The Service Item method also allows for more than one Labor Account to be associated with a Project.
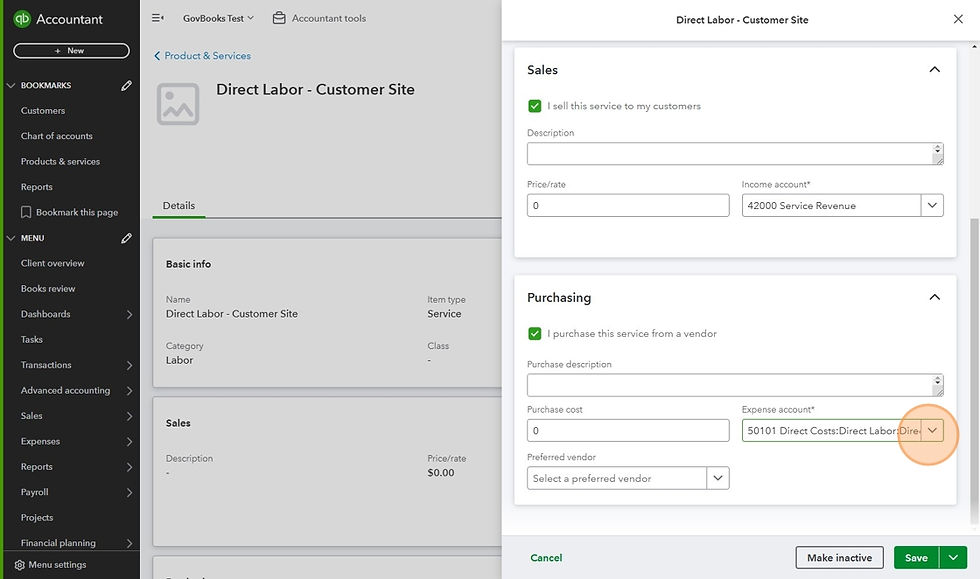
Step 1:
Check the box "I purchase this service from a vendor" in the Purchasing section of the Item edit screen in QuickBooks Online and select the appropriate Labor Account (general ledger account).
Step 2:
Ensure that time data in QuickBooks Online includes both the Project and Service Item. QuickBooks Time and several other third-party timekeeping systems will allow you to import the service item into QuickBooks Online, or you may need to select the service item manually, especially for some leave tracking systems.

Step 3:
Select "Use Service Items" in the "Account Mapping" field when calculating the Labor Distribution in GovBooks.
Step 4:
The Labor Distribution table displays the Service Item rather than the Labor Account. The Service Item is exported to QuickBooks Online instead of the Labor Account.

